Transform class in generativepy
Categories: generativepy generativepy tutorial

The Transform class can be used to apply transform to user space. After applying a transform, any subsequent drawing actions will be affected by the transform.
The Transform class supports all affine transformations:
- Translation.
- Scaling.
- Rotation.
- Mirroring.
- Shearing.
- General affine transformations.
Multiple transforms can be applied at the same time, so for example you can scale and rotate the user space.
Transform objects can be used in a with block to limit the scope of the applied transform, as we will see below.
Translation
Here is a simple example of translation:
from generativepy.drawing import make_image, setup
from generativepy.color import Color
from generativepy.geometry import Rectangle, Transform

def draw(ctx, pixel_width, pixel_height, frame_no, frame_count):

    setup(ctx, pixel_width, pixel_height, background=Color(0.8))

    blue = Color('blue')
    red = Color('red')
    thickness = 2

    Rectangle(ctx).of_corner_size((10, 10), 200, 150).stroke(blue, thickness)

    with Transform(ctx).translate(0, 200):
        Rectangle(ctx).of_corner_size((10, 10), 200, 150).stroke(red, thickness)


    with Transform(ctx) as t:
        Rectangle(ctx).of_corner_size((250, 100), 50, 150).fill(blue)
        t.translate(60, 10)
        Rectangle(ctx).of_corner_size((250, 100), 50, 150).fill(red)
        t.translate(60, 10)
        Rectangle(ctx).of_corner_size((250, 100), 50, 150).fill(red)

make_image("translate-tutorial.png", draw, 450, 400)
This code is available on github in tutorial/transforms/translate.py.
Here is the resulting image:
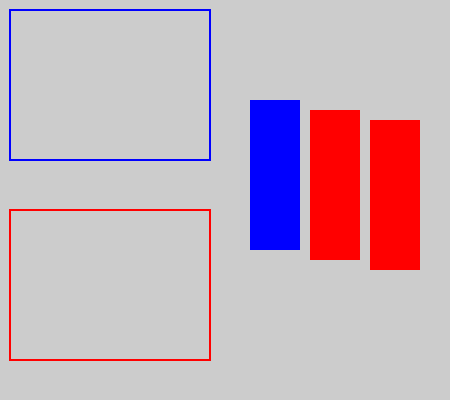
The first Rectangle we draw a reference rectangle at point (10. 10), outlined in blue.
We then use a Transform to translate the rectangle:
    with Transform(ctx).translate(0, 200):
        Rectangle(ctx).of_corner_size((10, 10), 200, 150).stroke(red, thickness)
We create the transform using Transform(ctx) and them apply translate(0, 200). This translates user space by 200 units in the y-direction. We create a with block based on this object.
We then draw a rectangle, outlined in red, with coordinates (10, 10). Due to the translation, it actually appears at (10, 210). It is directly below the original.
As we exit the first with block, the default coordinate system is restored, so anything we draw after that will not be translated.
We then use a second transform to draw three more rectangles:
    with Transform(ctx) as t:
        Rectangle(ctx).of_corner_size((250, 100), 50, 150).fill(blue)
        t.translate(60, 10)
        Rectangle(ctx).of_corner_size((250, 100), 50, 150).fill(red)
        t.translate(60, 10)
        Rectangle(ctx).of_corner_size((250, 100), 50, 150).fill(red)
This time, the Transform has no translation call. However, we use as t so we can access the Transform later.
We draw a filled blue rectangle at (250, 100). Since there is no translation, the rectangle is drawn at (250, 100).
Then we translate by (60, 10) using t (the original transform object). We draw a filled red rectangle at (250, 100), but due to the translation it appears at (310, 110).
Then we translate again by (60, 10) using t. This translation works on top of the previous translation, so we have a total translation of (120, 20). We draw a filled red rectangle at (250, 100), but due to the new translation it appears at (370, 120).
Scaling
Here is a simple example of scaling:
from generativepy.drawing import make_image, setup
from generativepy.color import Color
from generativepy.geometry import Rectangle, Transform, Circle

def draw(ctx, pixel_width, pixel_height, frame_no, frame_count):

    setup(ctx, pixel_width, pixel_height, background=Color(0.8))

    blue = Color('blue')
    red = Color('red')
    green = Color('green')
    thickness = 8

    Rectangle(ctx).of_corner_size((50, 40), 100, 30).fill(blue)

    with Transform(ctx).scale(1.5, 2):
        Rectangle(ctx).of_corner_size((50, 40), 100, 30).fill(red)


    with Transform(ctx) as t:
        Circle(ctx).of_center_radius((220, 260), 5).fill(green)
        Rectangle(ctx).of_corner_size((20, 160), 400, 200).stroke(blue, thickness)
        t.scale(0.5, 0.5, (220, 260))
        Rectangle(ctx).of_corner_size((20, 160), 400, 200).stroke(red, thickness)
        t.scale(0.5, 0.5, (220, 260))
        Rectangle(ctx).of_corner_size((20, 160), 400, 200).stroke(red, thickness)

make_image("scale-tutorial.png", draw, 450, 400)
This code is available on github in tutorial/transforms/scale.py.
Here is the resulting image:
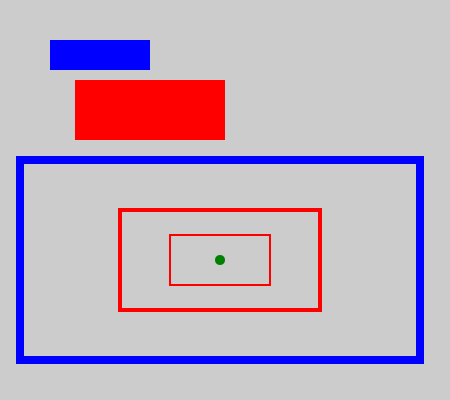
This example follows a similar pattern to the translate example.
First, we draw a rectangle in solid blue, then we scale it like this:
    with Transform(ctx).scale(1.5, 2):
        Rectangle(ctx).of_corner_size((50, 40), 100, 30).fill(red)
This scales user space by a factor of 1.5 in the x-direction and 2 in the y-direction. We draw the rectangle again filled with blue. The rectangle is 1.5 times wider and twice as high. Also notice that it is further away from the origin. That is because the whole of user space has been scaled. The top corner of the rectangle (100, 30) has actually moved to (150, 60) in device space because of the scaling.
Next, we apply successive scaling like this:
    with Transform(ctx) as t:
        Circle(ctx).of_center_radius((220, 260), 5).fill(green)
        Rectangle(ctx).of_corner_size((20, 160), 400, 200).stroke(blue, thickness)
        t.scale(0.5, 0.5, (220, 260))
        Rectangle(ctx).of_corner_size((20, 160), 400, 200).stroke(red, thickness)
        t.scale(0.5, 0.5, (220, 260))
        Rectangle(ctx).of_corner_size((20, 160), 400, 200).stroke(red, thickness)
We first draw a small green circle at point (220, 260). This marks the point we will use as our centre of scaling.
We draw a rectangle outlined in blue. The green dot is actually right at the centre of the rectangle.
Next, we scale by 0.5 in each direction and draw the rectangle again, this time outlined in red. The new rectangle is half the size of the original, but since our centre of scaling is the centre of the original rectangle, the new rectangle is right in the middle of the original.
Then we do the same again. The new scaling works in addition to the previous scaling, so the new rectangle is a quarter of the size of the original rectangle.
Rotation
Here is a simple example of rotation:
from generativepy.drawing import make_image, setup
from generativepy.color import Color
from generativepy.geometry import Rectangle, Transform, Circle
import math

def draw(ctx, pixel_width, pixel_height, frame_no, frame_count):

    setup(ctx, pixel_width, pixel_height, background=Color(0.8))

    blue = Color('blue')
    red = Color('red')
    green = Color('green')
    thickness = 4

    Rectangle(ctx).of_corner_size((100, 20), 100, 50).fill(blue)

    with Transform(ctx).rotate(math.pi/4):
        Rectangle(ctx).of_corner_size((100, 20), 100, 50).fill(red)

    with Transform(ctx) as t:
        Rectangle(ctx).of_corner_size((200, 150), 100, 100).stroke(blue, thickness)
        t.rotate(math.pi/6, (200, 150))
        Rectangle(ctx).of_corner_size((200, 150), 100, 100).stroke(red, thickness)
        t.rotate(math.pi/6, (200, 150))
        Rectangle(ctx).of_corner_size((200, 150), 100, 100).stroke(red, thickness)
        Circle(ctx).of_center_radius((200, 150), 5).fill(green)

make_image("rotate-tutorial.png", draw, 450, 400)
This code is available on github in tutorial/transforms/rotate.py.
Here is the resulting image:
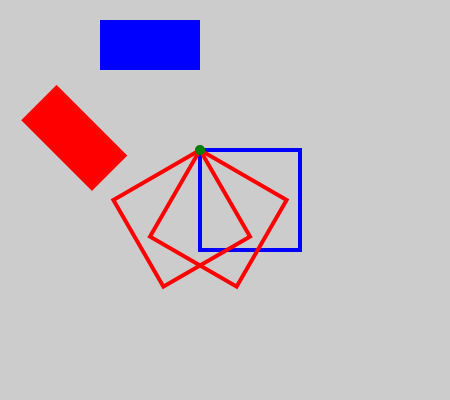
This is similar to the scaling example.
The first rectangle is drawn in solid blue. It is rotated about the origin to draw the solid red rectangle. Rotation is measured in radians. pi radians corresponds to 180 degrees, so the pi/4 radians is 45 degrees.
The second Transform draws a square, then rotates it by pi/6 (30 degrees) about the point (200, 250). That is actually the top left corner of the square, so you will see that the square rotates about that corner. We draw the square a third time rotated by another 30 degrees (60 in total).
Mirroring
Transform doesn't support mirroring directly. Instead, we can use scaling with a negative scale factor. A factor of -1 cause mirroring without changing the item's size. Here is an example:
from generativepy.drawing import make_image, setup
from generativepy.color import Color
from generativepy.geometry import Text, Transform, Line

def draw(ctx, pixel_width, pixel_height, frame_no, frame_count):

    setup(ctx, pixel_width, pixel_height, background=Color(0.8))

    blue = Color('blue')
    red = Color('red')
    green = Color('green')
    thickness = 4

    Text(ctx).of('F', (40, 100)).size(100).fill(blue)
    Line(ctx).of_start_end((100, 20), (100, 110)).stroke(green, thickness)

    with Transform(ctx).scale(-1, 1, (100, 0)):
        Text(ctx).of('F', (40, 100)).size(100).fill(red)

    Text(ctx).of('W', (240, 100)).size(100).fill(blue)
    Line(ctx).of_start_end((240, 70), (340, 70)).stroke(green, thickness)

    with Transform(ctx).scale(1, -1, (0, 60)):
        Text(ctx).of('W', (240, 100)).size(100).fill(red.with_a(0.6))


make_image("mirror-tutorial.png", draw, 450, 150)
This code is available on github in tutorial/transforms/mirror.py.
Here is the resulting image:
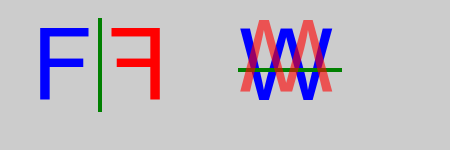
This part of the code mirrors an item horizontally:
    Text(ctx).of('F', (40, 100)).size(100).fill(blue)
    Line(ctx).of_start_end((100, 20), (100, 110)).stroke(green, thickness)

    with Transform(ctx).scale(-1, 1, (100, 0)):
        Text(ctx).of('F', (40, 100)).size(100).fill(red)
First, we draw a large letter F in blue. We also draw a vertical line at x = 100. This is the line we will mirror across.
To do the actual mirroring, we use scale(-1, 1, (100, 0)). This flips the letter in the x-direction but leaves it completely unchanged in the y-direction (because scaling something by a factor of 1 has no effect on it).
The centre of scaling is the point (100, 0). In fact, the y value is irrelevant here, because we aren't scaling in the y-direction. The important thing is the x value of 100, which determines the line of reflection.
This part of the code mirrors an item vertically:
    Text(ctx).of('W', (240, 100)).size(100).fill(blue)
    Line(ctx).of_start_end((240, 70), (340, 70)).stroke(green, thickness)

    with Transform(ctx).scale(1, -1, (0, 60)):
        Text(ctx).of('W', (240, 100)).size(100).fill(red.with_a(0.6))
This is very similar, but we are mirroring in the y-direction. The scale factor is 1 for x, -y for y. The centre of scaling is (0, 60), which means that scaling takes place over the line y = 60, and the x value is irrelevant.
We can also flip in the x and y directions, in one operation, by specifying a scale factor of -1 for both x and y. In that case, the x and y values of the centre of scaling are both significant. Flipping in both directions has the same effect as rotating by 180 degrees about the centre of scaling.
Advanced transforms
Here we will take a quick look at more advanced transforms:
- Nested transforms.
- General matrix transforms, using shear as an example.
from generativepy.drawing import make_image, setup
from generativepy.color import Color
from generativepy.geometry import Text, Transform

def draw(ctx, pixel_width, pixel_height, frame_no, frame_count):

    setup(ctx, pixel_width, pixel_height, background=Color(0.8))

    blue = Color('blue')
    red = Color('red')

    with Transform(ctx).translate(50, 150):
        with Transform(ctx).matrix([1, 0, -0.5, 1, 0, 0]):
            Text(ctx).of('A', (0, 0)).size(100).fill(red)
        Text(ctx).of('B', (80, 0)).size(100).fill(blue)


make_image("advanced-transform.png", draw, 450, 200)
This code is available on github in tutorial/transforms/advanced.py.
Here is the resulting image:

The main code consists of two nested Transform blocks.
The first applies translate(50, 150), a simple translation.
The second applies a matrix transformation matrix([1, 0, -0.5, 1, 0, 0]). This is just a standard 6 element transform matrix. We won't cover it in detail here, but a matrix can represent any affine transformation, including translation, scaling, rotation, mirroring, and any combination of any number of those operations applied together. It can also represent other transforms. In this case, we are using it to shear.
We create a Text element with a red letter A inside the inner transform with block. This text has both the translate and the shear applied, so the letter is skewed to the right.
We create another Textelement with a blue letter B. This is outside the inner with block, so the shear transform will have been deactivated. But it is still inside the outer with block so the translate transform still applies.
See also
Join the PythonInformer Newsletter
Sign up using this form to receive an email when new content is added:
Popular tags
2d arrays abstract data type alignment and angle animation arc array arrays bar chart bar style behavioural pattern bezier curve built-in function callable object chain circle classes clipping close closure cmyk colour combinations comparison operator comprehension context context manager conversion count creational pattern data science data types decorator design pattern device space dictionary drawing duck typing efficiency ellipse else encryption enumerate fill filter font font style for loop formula function function composition function plot functools game development generativepy tutorial generator geometry gif global variable gradient greyscale higher order function hsl html image image processing imagesurface immutable object in operator index inner function input installing iter iterable iterator itertools join l system lambda function latex len lerp line line plot line style linear gradient linspace list list comprehension logical operator lru_cache magic method mandelbrot mandelbrot set map marker style matplotlib monad mutability named parameter numeric python numpy object open operator optimisation optional parameter or pandas partial application path pattern permutations pie chart pil pillow polygon pong positional parameter print product programming paradigms programming techniques pure function python standard library radial gradient range recipes rectangle recursion reduce regular polygon repeat rgb rotation roundrect scaling scatter plot scipy sector segment sequence setup shape singleton slice slicing sound spirograph sprite square str stream string stroke structural pattern subpath symmetric encryption template tex text text metrics tinkerbell fractal transform translation transparency triangle truthy value tuple turtle unpacking user space vectorisation webserver website while loop zip zip_longest
