Sprites in pygame
Categories: pygame
A sprite is a two dimensional figure that forms part of your game. Most of the visible elements in your game will be sprites.
For example, in a game of breakout, you might find the following sprite objects:
- The ball is a sprite that moves around the the screen, bouncing off things and destroying bricks.
- The bat is a sprite that the user controls with the keyboard/mouse/joystick.
- Each brick is a sprite. Bricks don't usually move, but they are destroyed when the ball hits them.
- The walls might also be made up of sprites. They don't usually move or get destroyed, but the ball bounces off them.
There may be other sprites, for example gold coins or bombs might fall every so often that the player has to try to catch or avoid with the bat. If your game displays the current score and the number of lives left, they might also be sprites.
What can sprites do?
In pygame, each sprite is a self contained object. It has several built-in abilities:
- It can draw itself on the screen in the correct position.
- It knows how to move. For example, the ball will move in a straight line unless it hits something.
- It knows what to do if it collides with another sprite. For example, the ball will bounce off anything it collides with.
- It can destroy itself. For example, a brick will destroy itself if it collides with the ball (or more accurately, if the ball collides with the brick).
- It can change its appearance. For example, you might have some extra strong bricks that don't get destroyed until the ball has hit them 3 times. The brick might look more and more damaged each time it is hit, until it is destroyed.
When you design a game, it is often a good idea to try to make each sprite responsible for as much of its own behaviour as you can. That way, your main program doesn't have to do much at all.
In the breakout example, if you bat, ball, bricks and walls all look after themselves, your main program hardly has to do anything. It just needs wait until either all the bricks are gone (Win!) or the ball falls to the bottom of the screen (Lose!).
Designing the game like that also makes it easier to add new features.
Creating and drawing a sprite
We will start by creating and drawing a single sprite. We will make the sprite a ball.
The first thing we need to do is define a new class for the ball. Classes let us define our own types. We will defines a class called Ball, that is based on a class called Sprite, which pygame provides. Here is the definition:
class Ball(pg.sprite.Sprite):

    def __init__(self, pos):
        super(Ball, self).__init__()
        self.image = pg.image.load(os.path.join('resources', 'ball.png'))
        self.rect = self.image.get_rect()
        self.rect.center = pos

    def update(self):
        pass
We will cover this class in detail in the next tutorial. For now, we will just assume this code lets us create a sprite, and concentrate on the rest of the code.
Next we create an actual sprite based on the Ball object. We do this as follows:
ball = Ball((100, 200))
group = pg.sprite.RenderPlain()
group.add(ball)
This code first calls Ball to create a ball sprite positions at (100, 200).
We then create a sprite group called group. A sprite group holds one or more sprites, and allows us to do useful things with the whole group. Even though we only have one sprite, it is still very useful to put it in a group, because the group makes it easier to draw the sprite.
Our group is of type RenderPlain. This is a type of group than has the ability to render (ie draw) all the sprites it holds. Finally we add the ball sprite to the group.
The next thing we need to do is actually draw the sprite. We do this inside the main loop:
    screen.fill((0, 0, 0))
    group.draw(screen)
    pg.display.flip()
This code:
- Fills the screen surface with colour
(0, 0, 0), which represents black. - Calls
group.drawto draw the group of sprites onto the screen surface.groupis theRenderDrawobject we created earlier. Our group of sprites only contains one sprite, the ball we created earlier. - Calls
flipthat transfers the things we drew on the screen surface into the video buffer so we can actually see it (see below).
The end result is a window with the ball image drawn at position (100, 200).
Positioning sprites
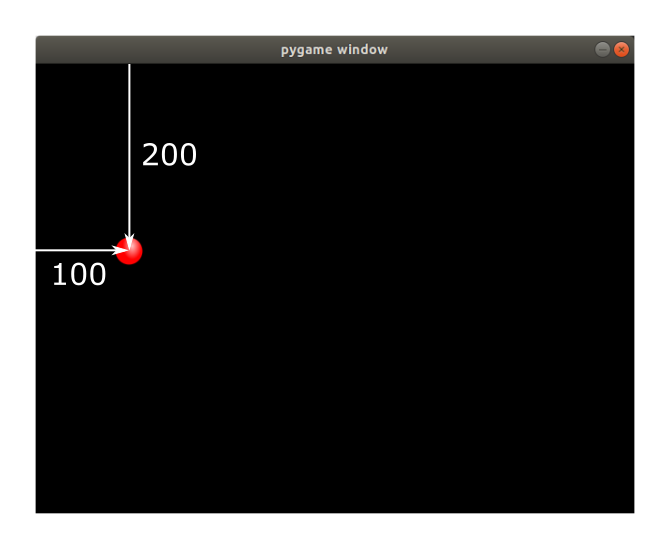
Just a note on positioning items of the screen. The position of a sprite is given by 2 coordindates:
- The
xcoordinate tells us the number of pixels horizontally, from the left hand edge of the screen. - The
ycoordinate tells us the number of pixels vertically, from the top of the screen.
Notice that y is measured in the opposite direction to a mathematical graph. The top of the screen is zero, and y gets bigger as you move down the screen.
Here is a ball with its centre at (100, 200) ie x = 100, y = 200:
Screen double-buffering
The image you see on your screen is stored in memory as a pixel buffer. This memory area, called the video memory, stores the colour of every pixel on the screen.
However, we don't draw directly to the video memory. That is because the drawing process involves clearing the memory, then drawing the individual sprites, one by one. This would cause flickering if we did it in the video memory.
Instead, we use a second memory buffer that is just ordinary memory (it doesn't affect the display). This is sometimes called the back buffer. We draw our sprites into that buffer. When we have finished drawing and every pixel is set to its final colour, we call flip, which copies that memory buffer into the actual video memory. This is called double-buffering.
You don't need to worry to much about this, because pygame sorts most of it out. You just need to remember:
- First, draw all your sprites etc using the
screenobject (this represents the back buffer). - Second, when all the drawing is complete, call
pg.display.flip()to copy the complete buffer into video memory.
The code
Here is the full code, with the changes described above added to the empty window code from the previous article:
import pygame as pg
import os

SCREEN_WIDTH = 640
SCREEN_HEIGHT = 480


class Ball(pg.sprite.Sprite):

    def __init__(self, pos):
        super(Ball, self).__init__()
        self.image = pg.image.load(os.path.join('resources', 'ball.png'))
        self.rect = self.image.get_rect()
        self.rect.center = pos

    def update(self):
        pass


# Initialise pygame
pg.init()

screen = pg.display.set_mode([SCREEN_WIDTH, SCREEN_HEIGHT])

# Create sprites
ball = Ball((100, 200))
group = pg.sprite.RenderPlain()
group.add(ball)

# Main loop, run until window closed
running = True
while running:

    # Check events
    for event in pg.event.get():
        if event.type == pg.QUIT:
            running = False

    screen.fill((0, 0, 0))
    group.draw(screen)
    pg.display.flip()

# close pygame
pg.quit()
Here is the result:
![]()
The source code is available on github as sprite.py.
Related articles
Join the GraphicMaths/PythonInformer Newsletter
Sign up using this form to receive an email when new content is added to the graphpicmaths or pythoninformer websites:
Popular tags
2d arrays abstract data type and angle animation arc array arrays bar chart bar style behavioural pattern bezier curve built-in function callable object chain circle classes close closure cmyk colour combinations comparison operator context context manager conversion count creational pattern data science data types decorator design pattern device space dictionary drawing duck typing efficiency ellipse else encryption enumerate fill filter for loop formula function function composition function plot functools game development generativepy tutorial generator geometry gif global variable greyscale higher order function hsl html image image processing imagesurface immutable object in operator index inner function input installing integer iter iterable iterator itertools join l system lambda function latex len lerp line line plot line style linear gradient linspace list list comprehension logical operator lru_cache magic method mandelbrot mandelbrot set map marker style matplotlib monad mutability named parameter numeric python numpy object open operator optimisation optional parameter or pandas path pattern permutations pie chart pil pillow polygon pong positional parameter print product programming paradigms programming techniques pure function python standard library range recipes rectangle recursion regular polygon repeat rgb rotation roundrect scaling scatter plot scipy sector segment sequence setup shape singleton slicing sound spirograph sprite square str stream string stroke structural pattern symmetric encryption template tex text tinkerbell fractal transform translation transparency triangle truthy value tuple turtle unpacking user space vectorisation webserver website while loop zip zip_longest