Image processing with pillow and NumPy
Categories: numpy pillow
In this section, we will learn how to use NumPy to store and manipulate image data. We will use the Python Imaging Library (PIL) to read and write data to standard image file formats.
This article explains how image data is stored in a NumPy array. Other articles include:
- NumPy image operations - cropping, padding, and flipping images using NumPy.
- NumPy image transformations - scaling, rotating, and general affine transforms on images using the ndimage module from the SciPy package.
If you want to learn more about numpy in general, try the other tutorials.
Before trying these examples you will need to install the NumPy and Pillow packages (Pillow is a fork of the PIL library).
Creating RGB Images in NumPy
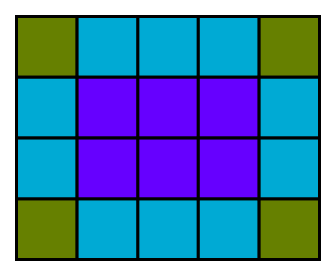
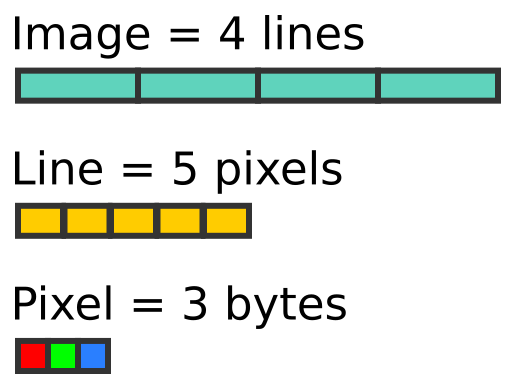
Here is a 5 by 4 pixel RGB image:
The image contains 4 lines of pixels. Each line of pixels contains 5 pixels. Each pixel contains 3 bytes (representing the red, green and blue values of the pixel colour):
RGB images are usually stored as 3-dimensional arrays of 8-bit unsigned integers. The shape of the array is:
height x width x 3.
Here is how we create an array to represent a 5 pixel wide by 4 pixel high image:
import numpy as np

width = 5
height = 4

array = np.zeros([height, width, 3], dtype=np.uint8)
Notice that the first dimension is the height, and the second dimension is the width. That is because the data is ordered by lines, then each line is ordered by pixels, and finally, each pixel contains 3-byte values for RGB. Each colour is represented by an unsigned byte (numpy type uint8).
This format is different to the way image dimensions are specified in most software. They are usually specified as width and then height. NumPy generally indexes 2-dimensional data as a row number followed by a column number, similar to the way a spreadsheet indexes its cells.
Now let's fill the array with orange pixels (red=255, green=128, blue=0). We use slices to do this, the three values are broadcast across all the rows and columns of the array:
array[:,:] = [255, 128, 0]
Saving an RGB NumPy image using PIL
Now we can use fromarray to create a PIL image from the NumPy array, and save it as a PNG file:
from PIL import Image

img = Image.fromarray(array)
img.save('testrgb.png')
The PIL function Image.fromarray function creates a PIL image from a NumPy array. If the NumPy array has the shape (height, width, 3) it will automatically create an RGB image. We can then use the PIL function save to save the image. By default, the image type will be based on the file extension, so in this case, it will be a PNG image.
PIL creates an RGB image by default because the array has 3 colour channels. We will see later that if there are 4 channels an RGBA image is created, and if there is only 1 channel a greyscale image is created. These are defaults, it is possible to use different colour spaces using the fromarray mode parameter, see the PIL documentation.
Now let's add some code to create a NumPy image and then save it:
import numpy as np
from PIL import Image

array = np.zeros([100, 200, 3], dtype=np.uint8)
array[:,:100] = [255, 128, 0] #Orange left side
array[:,100:] = [0, 0, 255]   #Blue right side

img = Image.fromarray(array)
img.save('testrgb.png')
What does this code do?
- Creates a 100 (height) by 200 (width) by 3 (colours) pixel array.
- Use slice notation to fill the left half of the array with orange.
- Use slice notation to fill the right half of the array with blue.
And here is the image:

Creating RGBA images with NumPy and PIL
An RGBA image has 4 channels (unlike an RGB image that has only 3). The fourth channel is an alpha channel. An alpha value of 255 will make the pixel fully opaque, a value of 0 will make it fully transparent, and values in between will make the pixel partly transparent.
In the code below we create an RGBA image, initially setting the same blue and orange areas as before, with an alpha value of 255. We then create a 1-dimensional array of length 200 with values that gradually change from 0 to 255. We fill channel 3 of each line of the image with these values. This means that the pixels on the left side of the image will be transparent, and the pixels on the right will be almost fully opaque. The transparency varies smoothly from left to right:
import numpy as np
from PIL import Image

array = np.zeros([100, 200, 4], dtype=np.uint8)
array[:,:100] = [255, 128, 0, 255] #Orange left side
array[:,100:] = [0, 0, 255, 255]   #Blue right side

# Set transparency based on x position
array[:, :, 3] = np.linspace(0, 255, 200)

img = Image.fromarray(array)
img.save('testrgba.png')
And here is the image:

The left-hand side of the image is more transparent. This allows the white background of the page to show through, making the colour appear lighter towards the left.
Creating greyscale images with NumPy and PIL
Greyscale images are handled slightly differently. Because there is only one channel, there is no need to create a 3-dimensional array, you should use a 2-dimensional array instead:
import numpy as np
from PIL import Image

array = np.zeros([100, 200], dtype=np.uint8)

# Set grey value to black or white depending on x position
for x in range(200):
    for y in range(100):
        if (x % 16) // 8 == (y % 16) // 8:
            array[y, x] = 0
        else:
            array[y, x] = 255

img = Image.fromarray(array)
img.save('testgrey.png')
In this case, we have created a chequerboard image:

Reading images into NumPy using PIL
You can read an image using the PIL open function, and convert it to an array using the numpy array function. Here, we read the images that were created previously, and print their NumPy shape:
import numpy as np
from PIL import Image

img = Image.open('testrgba.png')
array = np.array(img)
print(array.shape)      # (100, 200, 4)

img = Image.open('testrgb.png')
array = np.array(img)
print(array.shape)      # (100, 200, 3)

img = Image.open('testgrey.png')
array = np.array(img)
print(array.shape)      # (100, 200)
You can manipulate the image data and write it back out to a file. For example, this code inverts a greyscale image (swapping black and white). and saves it back:
import numpy as np
from PIL import Image

img = Image.open('testgrey.png')
array = np.array(img)

array = 255 - array

invimg = Image.fromarray(array)
invimg.save('testgrey-inverted.png')
This is a very simple example of image processing. See the links at the start of this article for other image processing techniques using NumPy.
Related articles
Join the GraphicMaths/PythonInformer Newsletter
Sign up using this form to receive an email when new content is added to the graphpicmaths or pythoninformer websites:
Popular tags
2d arrays abstract data type and angle animation arc array arrays bar chart bar style behavioural pattern bezier curve built-in function callable object chain circle classes close closure cmyk colour combinations comparison operator context context manager conversion count creational pattern data science data types decorator design pattern device space dictionary drawing duck typing efficiency ellipse else encryption enumerate fill filter for loop formula function function composition function plot functools game development generativepy tutorial generator geometry gif global variable greyscale higher order function hsl html image image processing imagesurface immutable object in operator index inner function input installing integer iter iterable iterator itertools join l system lambda function latex len lerp line line plot line style linear gradient linspace list list comprehension logical operator lru_cache magic method mandelbrot mandelbrot set map marker style matplotlib monad mutability named parameter numeric python numpy object open operator optimisation optional parameter or pandas path pattern permutations pie chart pil pillow polygon pong positional parameter print product programming paradigms programming techniques pure function python standard library range recipes rectangle recursion regular polygon repeat rgb rotation roundrect scaling scatter plot scipy sector segment sequence setup shape singleton slicing sound spirograph sprite square str stream string stroke structural pattern symmetric encryption template tex text tinkerbell fractal transform translation transparency triangle truthy value tuple turtle unpacking user space vectorisation webserver website while loop zip zip_longest