Converting markdown
Categories: static site generator
In the previous article we looked at what static sites are, and how they work.
Now we will look at how to convert a single markdown file into an HTML file.
The conversion process
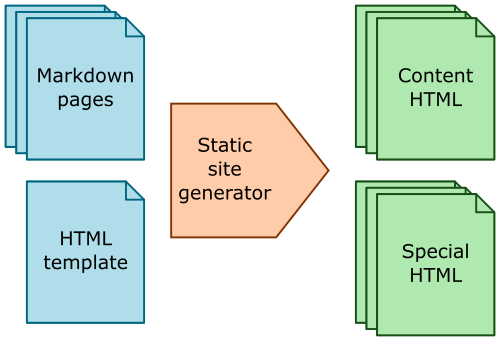
This diagram from the previous article shows the basic process for converting a set of markdown files into the required HTML files for a complete website:
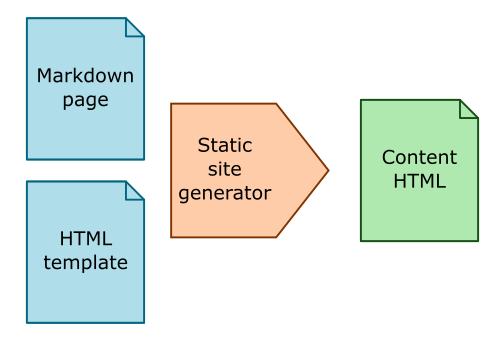
This time we will look in more detail at what is involved in converting a single page of markdown into the corresponding HTML file:
Here is an example markdown file, test.md:
---
author: Martin McBride
title: Features of markdown
date: 2020-05-23
tags:
- markdown
- conversion
---
Markdown supports styles such as **bold** and *italic*.
It also supports [hyperlinks](http://www.pythoninformer.com).
And images:

This actually isn't a pure markdown file. The top part of the file is meta-data for the page, in a format called yaml. Many static site generators use a similar system. The yaml is contained between the two '---' markers. The rest of the file (after the second '---') is the markdown content of the file. But for brevity we will call the entire file a markdown file.
Converting this page to HTML actually involves 4 separate tasks:
- Split the file into yaml and markdown parts
- Extract the meta-data from the YAML.
- Convert the markdown to an HTML fragment (the page content).
- Combine the meta-data and page content with the HTML template to create a complete HTML file.
Fortunately, if we use the right Python libraries, each of these steps is very easy.
Splitting the file
This part is fairly standard Python. We read the markdown file in, line by line, and create two strings, ym that contains the yaml text, and md that contains the markdown text.
with open('test.md') as infile:

    for s in infile:
        if s.startswith('---'):
            break;

    yaml_lines = []
    for s in infile:
        if s.startswith('---'):
            break;
        else:
            yaml_lines.append(s)

    ym = ''.join(yaml_lines)
    md = ''.join(infile)
Python allows us to treat a text file as a sequence of lines of text, that we can loop through using a for loop.
The first loop discards strings until we find the first '---'. The second loop reads all the strings until the next '---'. Those are the yaml_lines. Finally, all the remaining lines after the second '---' are the markdown data.
We join all the yaml_lines to form a string ym. We join all the lines of markdown data to form the string md.
Parsing the yaml data
We will use the Python yaml library to parse the yaml data, like this:
import yaml

info = yaml.load(ym, yaml.SafeLoader)
print(info)
This parses a block of yaml text and creates a dictionary with the result. Here is what it prints:
{'author': 'Martin McBride',
 'title': 'Features of markdown',
 'date': datetime.date(2020, 5, 23),
 'tags': ['markdown', 'conversion']}
This is the same data as we had on the test.md file, but now in the form of a Python dictionary.
Notice that the tags element has a list of values. That is because the yaml header uses a syntax for tags that allows for multiple values.
Converting the markdown data
Here we convert the second part of the file, the markdown data, into an html fragment, like this:
import markdown

content = markdown.markdown(md)
print(content)
We are using the markdown library to do the conversion. This takes a markdown format string and returns an html string. Based on the markdown code above, the html content string will be:
<p>Markdown supports styles such as <strong>bold</strong> and <em>italic</em>.</p>
<p>It also supports <a href="http://www.pythoninformer.com">hyperlinks</a> and images:</p>
<p><img alt="alt text" src="/img/cute-cat.jpg" /></p>
As you can see it correctly marked up the bold and italic text, hyperlink, and image. The markdown method has several extensions that can be added, for example to provide syntax highlighting, but we aren't using those here.
The output is an html fragment. It places each paragraph inside its own paragraph tags, but it doesn't provide higher level tags such as a body tag. It is assumed that the html fragment will be place within a full html document (which we will do next).
Creating the full html
We create our final html using a template like this:
<!DOCTYPE html>
<html>
<head>
<title>{{title}}</title>
</head>
<body>

<h1>{{title}}</h1>
<p>By {{author}}, {{date}}</p>

{{{content}}}

</body>
</html>
This template is just a basic html page. For a real website, you would probably want to use something more sophisticated, maybe a responsive template and some CSS styling.
But the basic method is the same. You use a full html page template, but with placeholders for variable content such as the title of the page, the author's name, and the main content itself.
The placeholders are enclosed in double curly brackets, for example {{title}}. We use the pystache module to substitute real values for the placeholders to create the final html. Here is the code:
import pystache

info['content'] = content
html = pystache.render(template, info)
print(html)
The render function accepts the html template, plus a dictionary that maps the template names on to their values.
Notice that the info dictionary we are using comes straight from the yaml parser. It already contains entries for the title, author and date. The trick here is to make sure that each tag in the html template exactly matches the equivalent field in the yaml header. That way, pystache will be looking for the same tags that the yaml parser stored.
Well that isn't quite true. The info dictionary doesn't yet have an entry for content, because the content comes from the markdown. So we add and extra element to the dictionary, called 'content', containing the processed markdown content.
The other thing to notice is that we use triple brackets for content - {{{content}}}. The reason for this is that the content is raw html data:
- For {{value}}, pystache renders the value assuming it is text that you want to display. If it contains html characters such as
<it will use escape characters so the the symbol is displayed as a<in the browser. That is what you would want in the page title, for instance. - For {{{value}}}, pystache renders the text unaltered, so it the text contains
<p>, it will cause a paragraph break. This is what you want for the page content, which does include paragraph breaks.
Putting it all together
This has taken a bit of explaining, but if you actually look at the code to convert the yaml plus markdown into a final html page, it is remarkably simple:
info = yaml.load(ym, yaml.SafeLoader)
content = markdown.markdown(md)
with open('template.html') as infile:
    template = infile.read()
info['content'] = content
html = pystache.render(template, info)
In the next article we will look at how to build a complete site.
Join the GraphicMaths/PythonInformer Newsletter
Sign up using this form to receive an email when new content is added to the graphpicmaths or pythoninformer websites:
Popular tags
2d arrays abstract data type and angle animation arc array arrays bar chart bar style behavioural pattern bezier curve built-in function callable object chain circle classes close closure cmyk colour combinations comparison operator context context manager conversion count creational pattern data science data types decorator design pattern device space dictionary drawing duck typing efficiency ellipse else encryption enumerate fill filter for loop formula function function composition function plot functools game development generativepy tutorial generator geometry gif global variable greyscale higher order function hsl html image image processing imagesurface immutable object in operator index inner function input installing integer iter iterable iterator itertools join l system lambda function latex len lerp line line plot line style linear gradient linspace list list comprehension logical operator lru_cache magic method mandelbrot mandelbrot set map marker style matplotlib monad mutability named parameter numeric python numpy object open operator optimisation optional parameter or pandas path pattern permutations pie chart pil pillow polygon pong positional parameter print product programming paradigms programming techniques pure function python standard library range recipes rectangle recursion regular polygon repeat rgb rotation roundrect scaling scatter plot scipy sector segment sequence setup shape singleton slicing sound spirograph sprite square str stream string stroke structural pattern symmetric encryption template tex text tinkerbell fractal transform translation transparency triangle truthy value tuple turtle unpacking user space vectorisation webserver website while loop zip zip_longest